

Friday, December 30, 2011
Saturday, December 3, 2011
The Day-Dreamer
Hey all! It has been a Very long time hasent it? So much has happened, in such a short period of time. And now 2011 is drawing to a close, but what will 2012 hold? Who knows! That is the most exciting part of life.
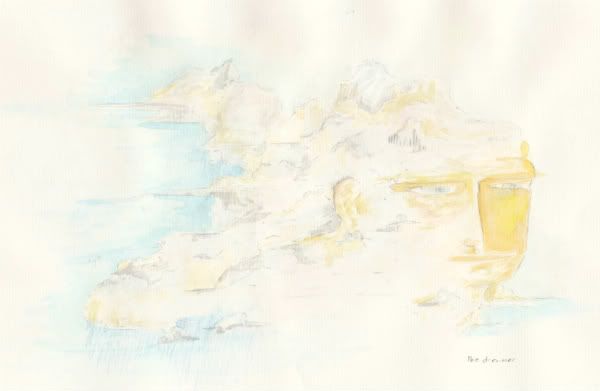
"The Dreamer" watercolour.
I would now like to share a poem I wrote for an unlucky water fowl, a few days ago.
in fact it's almost a sort of apology...
The duck.
I stand in the cold,
Clouds of breath,
Drifting snow.
And on this day.
A truck did pass by, on it’s way.
But as the truck goes, it’s tires
Slip over a duck
Quietly resting in the snow.
Thud.
A dull Crack.
Just another bump in the road…
The bird flounders
As if
Drowning
Flapping its useless wings, straining to break the surface
A strangled quack
Then lies still
The Lamenting wife, wheeled darkly against the bleak sky
Crying out
As her husband died
I made no move
So, I too stood still
I did nothing, though could have tried
But instead I swallowed these heroic ideas
And did not move.
In the snow,
The biting winds,
The duck didn’t even
Bleed.
Thanks for reading! Have a good week.
Saturday, September 24, 2011
Odysseus And The Cyclops: an epic cartoon.
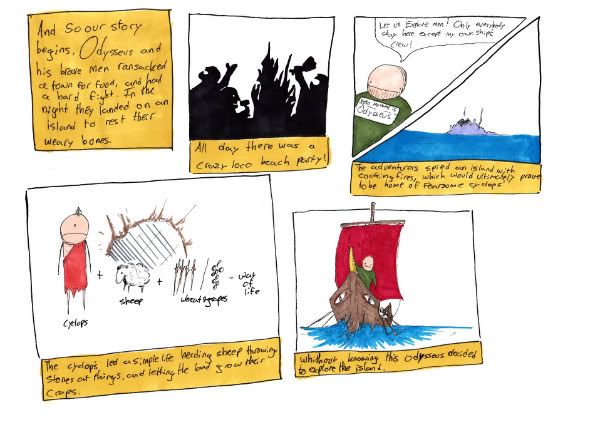
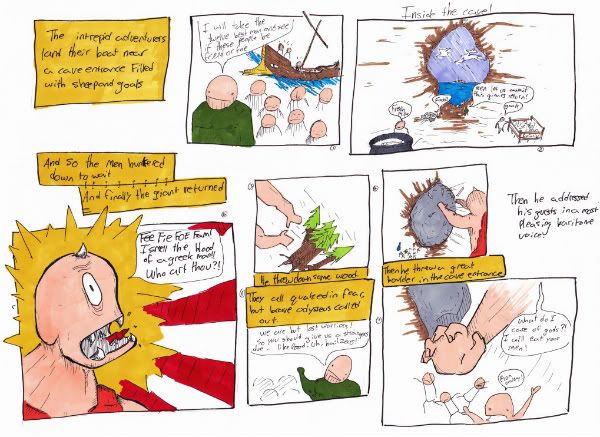

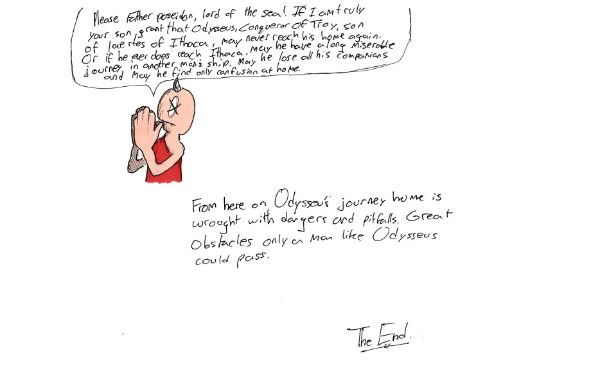
This was coloured with Prisma Colour Premier, artist markers.
Thursday, September 22, 2011
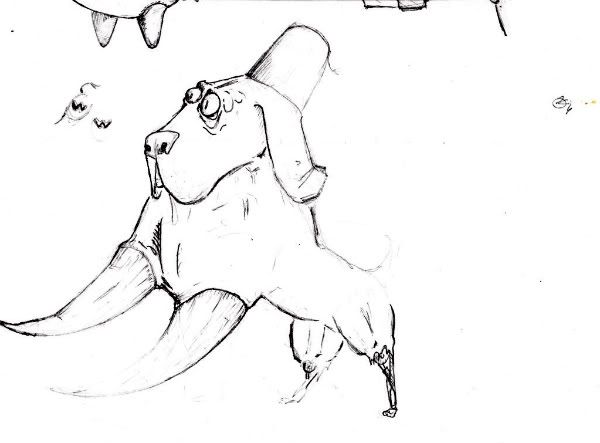
Ripley the fez wearing tusk-dog meets a rotting rabbit, and Bono.
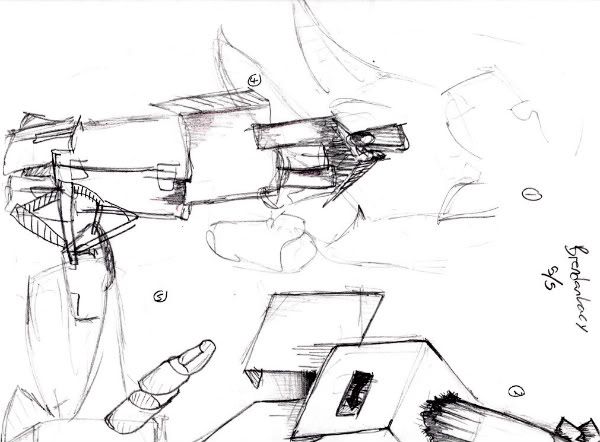
So last week and this week-end I nearly killed myself with this art project, Of just coming up with simple cartoon concept drawings. But, that's not how the project started, oh no its not that easy! My art teacher, announces that today we are going to make imprompitu (sp?) paper sculptures, that must be taller that 2 feet and must have at least 3 separate contact points on the table. Ok, Sayre Theo and I get to work making by far the most insane, and probably most unstable tower of impossibly folded paper ever in the history of that project (which the teacher had thought of like the week before). The next day, we have to SKETCH ALL THE SCULPTURES, and let me tell there are like twenty or so of these things. Here's the catch though, we had Less than a minute to sketch each one. After these were done, everyone in the class possesed a page of hurridly random scribbles, but to the creative eye, the perfect inspiration for kooky cartoon characters...Which is exactly what our teacher wanted us to do.
So here is the process of my drawings, from scribbles to concept to complete picture.
Sketches.

Concept.
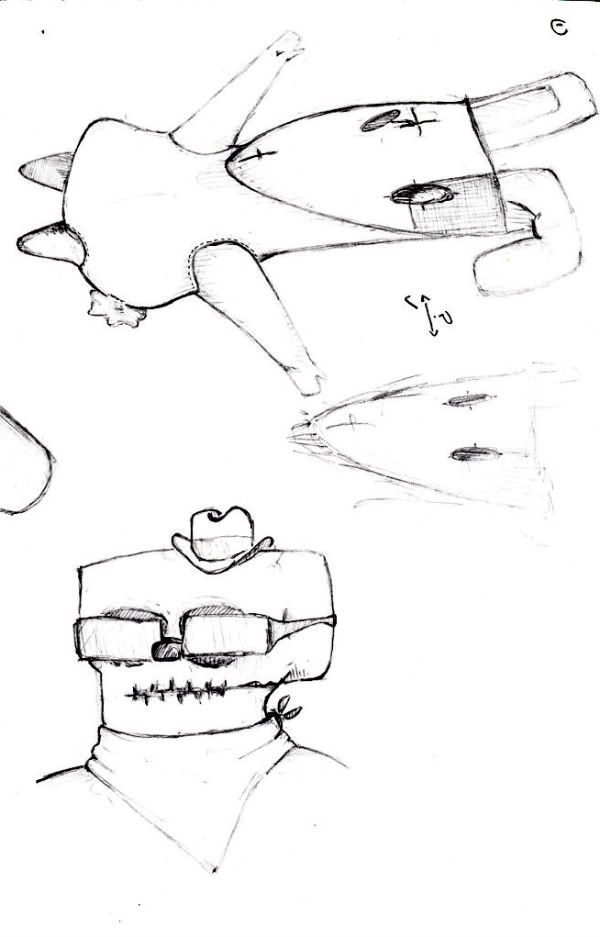
Finished product.
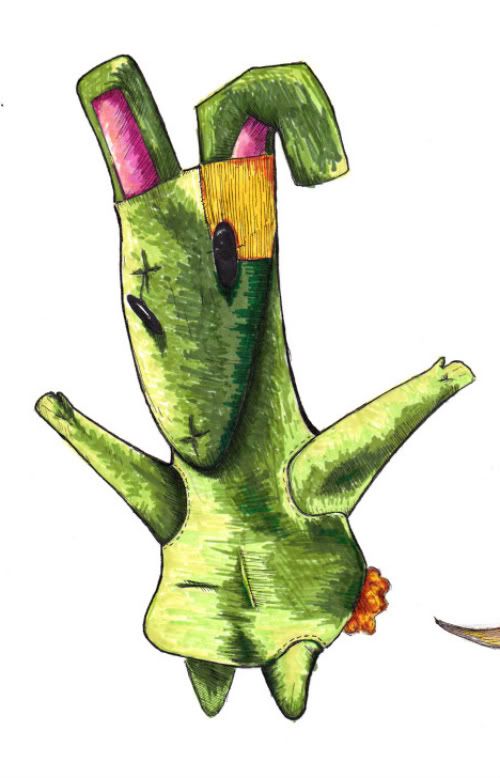
The Rotten green rabbit, little Timmy left him outside for the 'coons, but all he wants is to give you hug...with a knife.
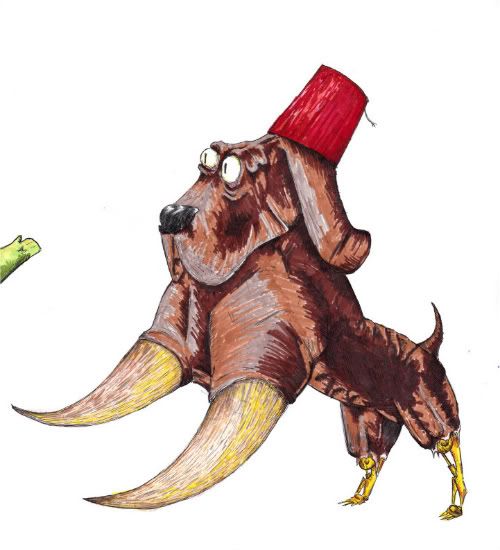
Ripely, fell into a vat of toxic waste while on post as a guard dog to a reactor in Egypt, he was found by Prof. Spectalular. The professor re-built Ripley with pointless golden robot legs, and crossed his DNA with that of an elephant. The Toxic waste obviously just gave him that stylish Fez attatched to his head.
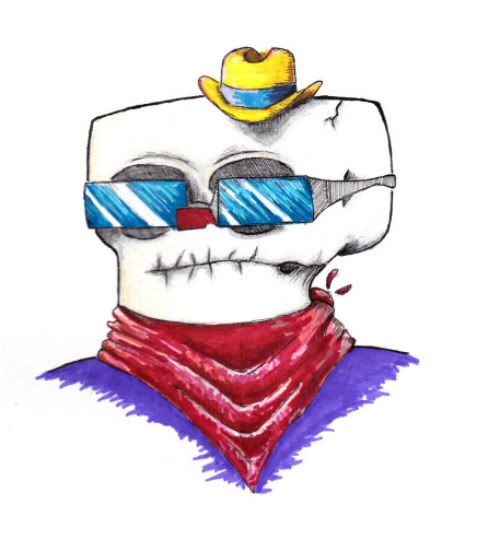
This guys name is Bone-o...Get IT?! He's like Bono but a skeleton! (and a cowboy.)
So here is the process of my drawings, from scribbles to concept to complete picture.
Sketches.
Concept.
Finished product.
The Rotten green rabbit, little Timmy left him outside for the 'coons, but all he wants is to give you hug...with a knife.
Ripely, fell into a vat of toxic waste while on post as a guard dog to a reactor in Egypt, he was found by Prof. Spectalular. The professor re-built Ripley with pointless golden robot legs, and crossed his DNA with that of an elephant. The Toxic waste obviously just gave him that stylish Fez attatched to his head.
This guys name is Bone-o...Get IT?! He's like Bono but a skeleton! (and a cowboy.)
Thursday, August 18, 2011
Makin' Shoes! part 1
One day I was walking the overcrowded streets of downtown Seattle wearing my facourite pair of Ragedy TOMS, when I looked in a shop window. In the display were pairs of nicer TOMS, some of which had rope soles. I cast a glance at my disgracful shoes, a passing policeman was also looking at my shoes.
"Son" he said with a nasaly voice "Those shoes are a complete disgrace! I'm going to have to write you a ticket for dirtying the sidewalk". He then promptly ripped a chunk out of a sleeping homeless mans shirt and wrote up my ticket, giving me a final word of advice, "One more offence like this and I'll give you a KNUCKLE SUPPER!"
I looked at my shoes, then the store window, then the sailors foot and shoe I was holding. An energy efficient LED light went on in my head."I am much to cheap to buy new shoes...."
"Damn right you are" grumbled the homeless man.
"....Then I will MAKE THEM!" I shouted triumphantly flinging the sailor's foot at the nearby hotdog vendor.
Now the people at the mental hospital said I was crazy (and maybe I am) but that doesn't mean that it's impossible to make shoes.
For this Wonderful project you will need...
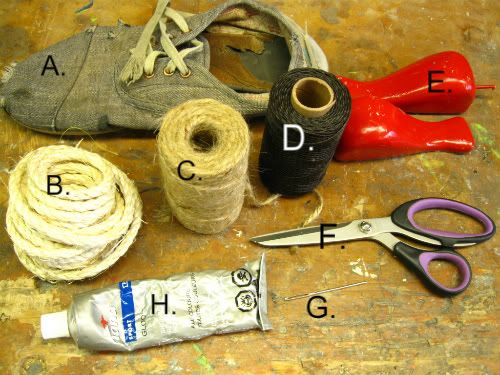
A. One pair of shoes that fit. ( Don't worry you will only use them as a giude for sole size)
B. Medium sized rope, does not have to be as coarse as mine.
C. Large twine, preferably slightly hairy as this covers easier.
D. Some kind of waxed cord.
E. Some kind of heavy weight for holding the rope down.
F. Scissors.
G. Large wool needle with a big enough eye to thread your twine through.
H. Shoe Gloo, very useful stuff that everyone should own.
* * * * *
Now that all the materials have been aquired, we can move onto step one of this crazy scheme.
1. Grab your shoe some weights and your thicker rope.
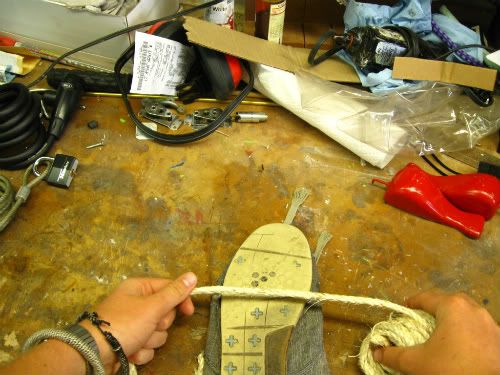
Then starting close to the middle, you are going to lay the rope down, generally tracing the shape of the sole, but working the coils progressively outwards, until there are three passes.
Like so...

Remember to keep that wily rope weighted down while you work.
2. This next step will take you by far the longest for the sole construction.
So, cut a nice long section of twine and thread it through your wool needle. Tie the free end to one of the outer sides of the rope coils near the middle. From there its just weaving the twine around the rope (under,over, under...etc) pulling things tightish as you go.
If you run out of twine, unthread the needle, and cut another piece. Then just tie it onto the loose end on the shoe with a reef knot. Re-thread and continue.
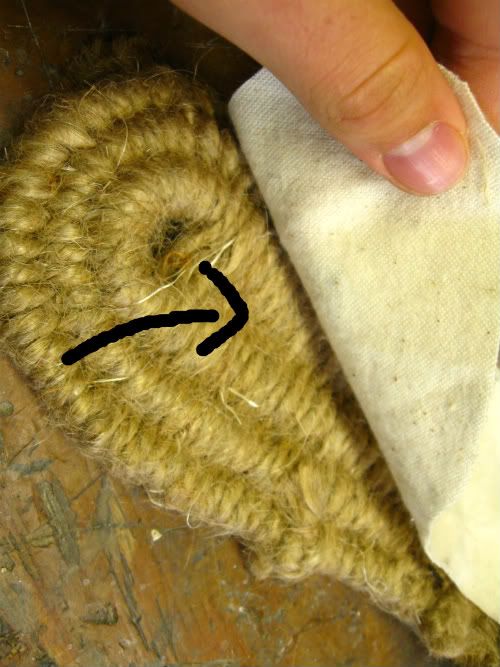
And when you get near the corve of the end, go accros like normal as close as you can get, then start weaving around the curve.
When thats all filled in, either weave into the middle and tie off the twine, cut a new piece and start on the unfilled half. Or, weave the twine along the side of the sole to the unfilled area, and start again.
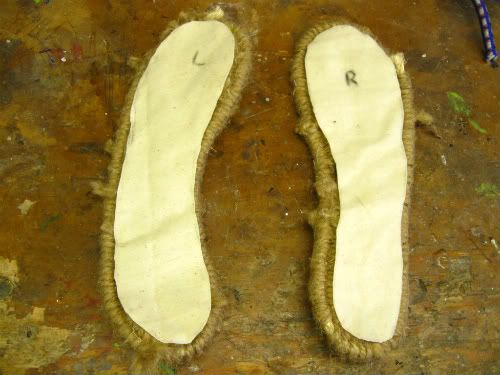
You will need to do this for both soles.
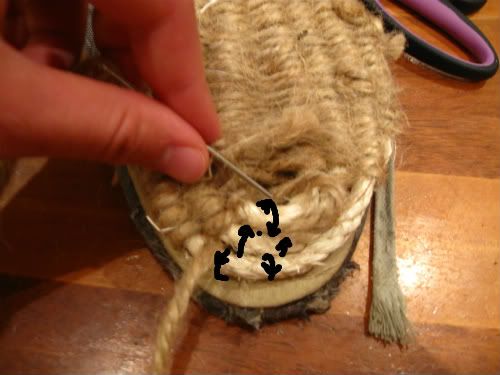
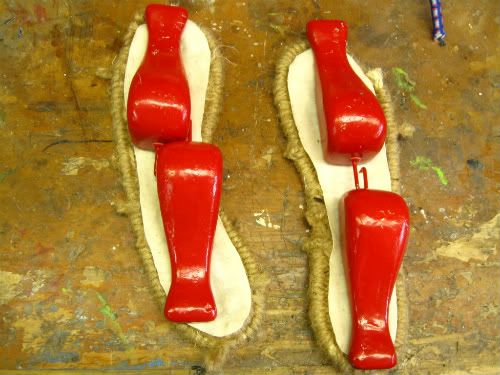
3. Well, that didn't take very long did it! So now that the primary of the soles are filled in, you can cut some fabric (flannel, linen whatever) that will just fit in the middle of the shoe.
Your going to put some gloo, right along the middle, under your fabric.
Lay down the gloo, and smear it around a bit with a popscicle stick.
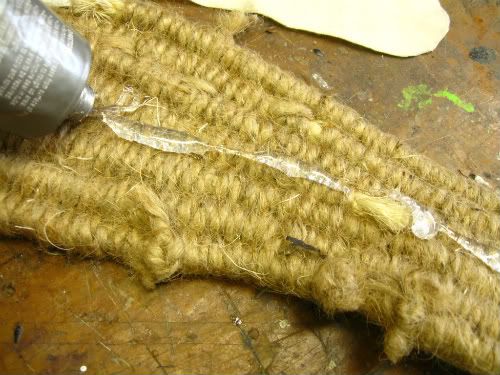
Then your going to want to weight everything down and let ti dry overnight.
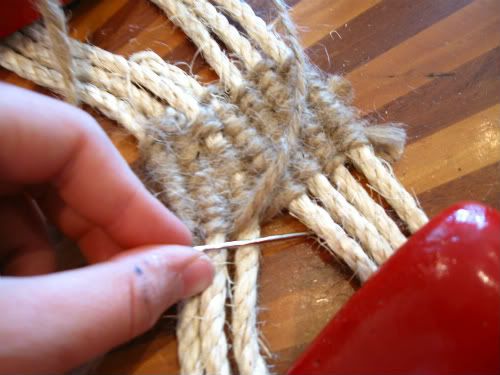
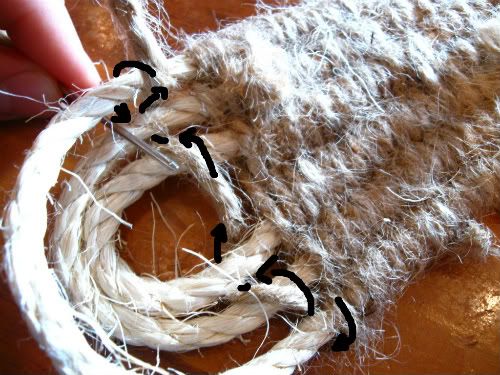
So after the Glue has dried or stopped smelling, grab your waxed cord (thread) and a sharper darning or tapestry needle and get sewing. Basically just stitch the edge of the cloth in the middle to the rope around it. There is no real wrong or right way to do this and realistically any old stitch will work, but I find an X stitch works exceptionally well and looks nice to boot!
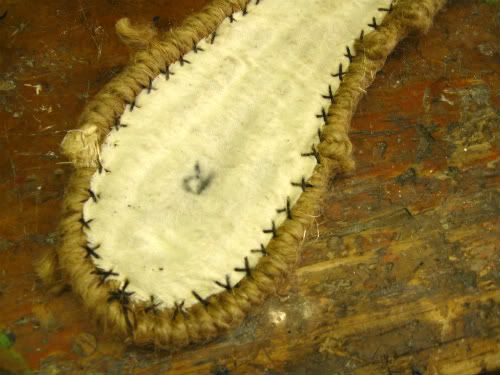
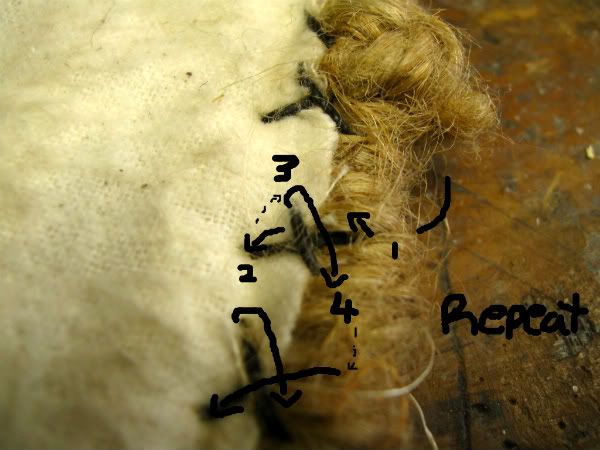
Follow these steps for the "X"!
And thats it for this first installment. There will be more, but bear with me as I actually have to make the rest of the shoes...as well as document it and write the blog! But it will get there don't worry!
Thanks for reading!
"Son" he said with a nasaly voice "Those shoes are a complete disgrace! I'm going to have to write you a ticket for dirtying the sidewalk". He then promptly ripped a chunk out of a sleeping homeless mans shirt and wrote up my ticket, giving me a final word of advice, "One more offence like this and I'll give you a KNUCKLE SUPPER!"
I looked at my shoes, then the store window, then the sailors foot and shoe I was holding. An energy efficient LED light went on in my head."I am much to cheap to buy new shoes...."
"Damn right you are" grumbled the homeless man.
"....Then I will MAKE THEM!" I shouted triumphantly flinging the sailor's foot at the nearby hotdog vendor.
Now the people at the mental hospital said I was crazy (and maybe I am) but that doesn't mean that it's impossible to make shoes.
For this Wonderful project you will need...
A. One pair of shoes that fit. ( Don't worry you will only use them as a giude for sole size)
B. Medium sized rope, does not have to be as coarse as mine.
C. Large twine, preferably slightly hairy as this covers easier.
D. Some kind of waxed cord.
E. Some kind of heavy weight for holding the rope down.
F. Scissors.
G. Large wool needle with a big enough eye to thread your twine through.
H. Shoe Gloo, very useful stuff that everyone should own.
* * * * *
Now that all the materials have been aquired, we can move onto step one of this crazy scheme.
1. Grab your shoe some weights and your thicker rope.
Then starting close to the middle, you are going to lay the rope down, generally tracing the shape of the sole, but working the coils progressively outwards, until there are three passes.
Like so...
Remember to keep that wily rope weighted down while you work.
2. This next step will take you by far the longest for the sole construction.
So, cut a nice long section of twine and thread it through your wool needle. Tie the free end to one of the outer sides of the rope coils near the middle. From there its just weaving the twine around the rope (under,over, under...etc) pulling things tightish as you go.
If you run out of twine, unthread the needle, and cut another piece. Then just tie it onto the loose end on the shoe with a reef knot. Re-thread and continue.
And when you get near the corve of the end, go accros like normal as close as you can get, then start weaving around the curve.
When thats all filled in, either weave into the middle and tie off the twine, cut a new piece and start on the unfilled half. Or, weave the twine along the side of the sole to the unfilled area, and start again.
You will need to do this for both soles.
3. Well, that didn't take very long did it! So now that the primary of the soles are filled in, you can cut some fabric (flannel, linen whatever) that will just fit in the middle of the shoe.
Your going to put some gloo, right along the middle, under your fabric.
Lay down the gloo, and smear it around a bit with a popscicle stick.
Then your going to want to weight everything down and let ti dry overnight.
So after the Glue has dried or stopped smelling, grab your waxed cord (thread) and a sharper darning or tapestry needle and get sewing. Basically just stitch the edge of the cloth in the middle to the rope around it. There is no real wrong or right way to do this and realistically any old stitch will work, but I find an X stitch works exceptionally well and looks nice to boot!
Follow these steps for the "X"!
And thats it for this first installment. There will be more, but bear with me as I actually have to make the rest of the shoes...as well as document it and write the blog! But it will get there don't worry!
Thanks for reading!
Tuesday, August 16, 2011
Who will know the Bluenose in the sun.
Bluenose by Stan Rogers is one of my favourite folk songs right now, and so I painted a black and white silhouette style on canvas, to hang ever so gracefully on my sisters kitchen wall.
Enjoy!

Enjoy!
Sunday, April 10, 2011
Not much is stirring in prehistoric pudding.
Well...its been two weeks since my last long post. Aaaand nothing has really happened since then. Except I went to a jazz festival with the juniors (where I got yelled at by a homeless man on a Vespa), and a rugby game (which we lost but had a "smashing" good time).
Here is a picture of a spanish dinosaur for your viewing pleasure.
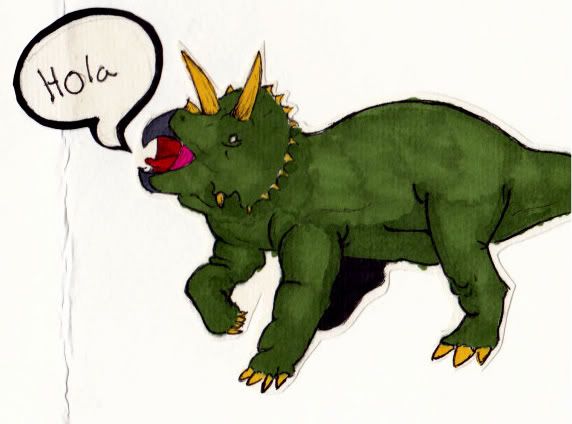
Here is a picture of a spanish dinosaur for your viewing pleasure.
Subscribe to:
Posts (Atom)